InstaLab™—The World’s First Mold Recognition AI/Software

Until recently, the primary method for mold testing and mold speciation was viable laboratory testing. This means certified mycologists examining a cultured specimen under a microscope. For over a decade, Mold Busters has been using this method to test air and surface samples collected from clients’ properties.
However, with huge leaps in artificial intelligence (AI) and machine learning, it is now possible to skip the lab and go straight to the answers, thereby reducing wait times drastically and eliminating human error.
At Mold Busters, we’re leveraging these advancements to provide faster and more accurate services, especially for our clients in Montreal and Ottawa.”
At least that’s the goal of our InstaLab™ mold recognition software…
Mold recognition AI: What is it?
Simply put, our machine learning system for mold identification works like any image recognition software: it scans an image (in this case, an image of a mold spore) and browses its database of mold images for a match based on various criteria like colour, cell structure and hyphae. Once it finds a match, it is able to identify the exact species of mold you are dealing with.
If this sounds like science fiction to you, you should know that similar systems are already being used in medicine. Radiologists, for example, are using artificial intelligence to detect abnormal cell growth and cancer in much the same way that we plan to use machine learning to detect toxic mold spores.
Building an open-source mold data set/library
Given that there are literally thousands of species of mold, trying to build a data set that encompasses all of them is an enormous challenge. That’s why we’re starting with a simple image recognition tool to identify and classify only the most common toxigenic mold species found in homes, such as Stachybotrys (black mold), Alternaria, Aspergillus and Cladosporium. Once this is done, we can apply the same concepts on a bigger scale to include all species of mold.
This goal can be reached even sooner if we pool together everyone’s resources and open the data set to the public. Basically InstaLab™ is an open-source endeavour that anyone can contribute to.
Technologies we’ll use to build our mold AI
A brief description of the tools that we are planning to use in this project.
- Anaconda: A free, open-source distribution of the Python and R programming languages for applications in data science and machine learning; aims to simplify package management and deployment
- Spyder: An open-source cross-platform IDE for scientific programming in the Python language; comes installed with Anaconda
- Tensorflow: An open-source software library for dataflow programming across a range of tasks
- Keras: An open-source neural network library written in Python
- CNN (Convolution Neural Network): A class of deep, feed-forward artificial neural networks, most commonly used in analyzing visual imagery. Here is a very good explanation of how it works.
Detailed plan of action
Here are the steps we plan to follow to achieve our goal:
- Collecting the data set
- Importing libraries and splitting the data set
- Building the CNN
- Establishing full connection
- Augmenting data
- Training the network
- Testing
1. Collecting the mold data set
In order to train our machine to differentiate between various species of mold, we need a huge amount of data. The machine analyzes this data and learns to identify common properties of different mold specimens, patterns in cell structure and other relationships between features.

This step will also help in testing our classifier.

2. Importing libraries and splitting data set
In order to reap the benefits of the libraries, we first need to import them.

We then need to split our data into two parts: training_set and test_set. In our case, the data set is already split into two parts.
3. Building the CNN
Building the CNN is the most important step for our network. It consists of three parts:
- Convolution
- Polling
- Flattening
The primary purpose of convolution is to extract features from the input image. Convolution preserves the spatial relationship between pixels by learning image features using small squares of input data.
Since every image can be considered as a matrix of pixel values. Consider a 5 x 5 image whose pixel values are only 0 and 1 (note that for a grayscale image, pixel values range from 0 to 255, the green matrix below is a special case where pixel values are only 0 and 1):

Also, consider another 3 x 3 matrix as shown below:

Then, the Convolution of the 5 x 5 image and the 3 x 3 matrix can be computed as shown in the image below:
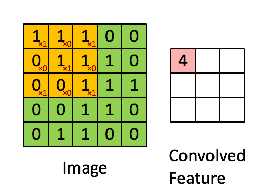
The obtained matrix is also known as the feature map. An additional operation called ReLU is used after every Convolution operation. The next step is of pooling.
Pooling (also called subsampling or downsampling) reduces the dimensionality of each feature map but retains the most important information. In case of Max Pooling, we define a spatial neighborhood (for example, a 2×2 window) and take the largest element from the rectified feature map within that window. Instead of taking the largest element we could also take the average (Average Pooling) or sum of all elements in that window. In practice, Max Pooling has been shown to work better.

After pooling comes flattening. Here the matrix is converted into a linear array so that to input it into the nodes of our neural network.
Let’s go to the code.

So now our CNN network looks like this:

4. Establishing full connection
This step refers to connecting our convolutional network to a neural network and then compiling our network.

Here we have made two-layer neural network with a sigmoid function as an activation function for the last layer as we need to find the probability of the object being black mold.
So now, the final network looks something like this:

5. Augmenting data
While training out data, we need a lot of data to train upon. Suppose we have a limited number of images for our network. What to do now?
We don’t need to hunt for novel new images that can be added to our data set. Why? Because, neural networks aren’t smart to begin with. For instance, a poorly trained neural network would think that these three images shown below are distinct, unique images.

The same image but translated.
So, to get more data, we just need to make minor alterations to our existing data set—for example, flips, translations or rotations. Our neural network would think these are distinct images.
Data augmentation is a way we can reduce overfitting on models, where we increase the amount of training data using information only in our training data. The field of data augmentation is not new, and in fact, various data augmentation techniques have been applied to specific problems.
And here goes the code:

Now we have a huge amount of data. It’s time for training.
6. Training the network
So, we completed all the steps of construction and it’s time to train our model.

With increasing number of epochs, the accuracy will increase.
7. Testing
Now let’s test a random image.


And, yes! Our network correctly predicted the image of the black mold! Though it is not 100% accurate, it will give correct predictions most of the time. To achieve higher accuracy, we can add more convolutional and pooling layers, number of nodes, and epochs.
How can you contribute?
If you’re interested in sharing your expertise in the deployment of machine learning systems or if you’d like to contribute data to our mold library, please contact us to discuss how we can get started.
How will mold recognition AI benefit people?
Once tested and fully functional, InstaLab™ will be able to identify toxigenic mold species much faster than a human, not to mention with greater accuracy and lower cost. No need to send samples by mail or in person to a microbiological laboratory. Simply upload an image of the suspect material and run the mold recognition software.
Perfect for indoor environmental professionals, mold inspectors and remediation technicians, contractors, university research labs and even testing laboratories themselves.